Reflections on a night shoot at Tennessee Valley Railroad Museum

September 9, 2017 – This is a shot of the first organized night photoshoot I’ve done on a train related subject other than my own. It was great! The photographer standing next to the light stand is Norfolk Southern Photographer Casey Thomason who did the lighting for the Railfest night shoot event and helped to make it happen with the support and help of the fine folks at the Tennessee Valley Railroad Museum in Chattanooga, TN. Outstanding job by all!

What’s pictured here is a small portion of the photographers that participated in the event where we shot several different views of Southern Railway diesel locomotives 5000, 3170, 2594 with a freight train and a Tennessee Alabama & Georgia Railway passenger train on the Chickamauga Creek bridge at the TVRM museum.

While everyone jockeyed around for space, for their version of the “perfect shot,” the event got underway about 9pm and it was close to midnight before everyone went their merry way after we did many rotations of the front line of photographers getting their chance for a clear shot.

This photograph I shot hand held, as I was letting a friend that wasn’t aware there was a night shoot during Railfest, use my tripod on the rotations. Casey was doing a 3 second countdown before firing the flashes and so I timed my exposure to start at the 1 second mark which opened my shutter right as the flash went off. Exposure was 1 second at f/8 at ISO 800 on my Nikon D800 at 42 mm on my Sigma 24-70mm lens and shot as a RAW file. 

New Scanner Feed and Web Cam Page

I’ve added a new page to my site that will have listings to Scanner feeds and Web Camera Feeds for areas that I frequent for rail photography. I hope you enjoy the new page and some of the feeds. Click Here to visit the page or you’ll find it on the Menu Bar at the top of every page.


Kids, Photography and a Roadtrip

Xavier, 5, using the Fuji Wide Instax instant camera.

Kids and Photography… (hang in there, the roadtrip part is toward the end of this post). With the advent of digital photography being in the hands of just about everyone via smart phones, tablets and digital cameras, the world of photography is in the hands of many kids starting at an early age. I personally have been photographing most of my nieces and nephews since the day they were born, even more so for their kids and their kids kids. As a result the youngest ones, my great-greats, started reaching for my camera or smart phone from a very early age.

About a year ago I started a project with my oldest little ones and photography. I decided that, once they turned four years old, I was going to get a camera that they could use and start taking them on photography adventures where I’d go with them in a one-on-one situation. It’s been a wonderful trip with the three oldest among my great-great nieces and nephews that live in my area.  Going out shooting with them and seeing the world from their viewpoint has been a blast.

Jayden with the Fuji Instax

I started the three of them out sharing a Fuji Wide Instax, a Polaroid type instant camera. I wanted to have them use something that would give them a tangible print that they could hold in their hand and watch develop, much like many of us older folk did when we were kids. I feel that has helped them enjoy shooting photos more. I also got each of them a photo album to keep their pictures in so they can share them with family and friends. All three of the boys, Xavier, Jayden, and Damion have moved on to shooting a digital camera lately.

Now, the instant camera is in reserve for our next young photographer, Elaina, who turns four in July. Damion, her brother, still wants to shoot with the instant camera sometimes, but at $1 per photo I’ve  decided to move him and the others more into the digital realm. This way they can zoom and take as many photos as they want. I just make sure and get 4×6 prints of the best of the photos they shoot by the next day and give them to them for their photo books. I really can’t stress too much how important I feel this is. For the young photographer to have an album to thumb through, to relive and to share his or her adventures in taking the photos is very important. If the image sits on the camera, which they need to have adult supervision when using, or on a laptop that they can’t use without an adult, it’s hard for them to go back and look at their pictures whenever they want to. I feel having easy access is a very important part of their growth in this visual world!

Damion shooting with a Fuji FinePix S4250

Now, they are 4-5 years old and, with this in mind, I didn’t want to start them out on a expensive digital point and shoot camera. I’ve worked with them on handling the camera carefully and to keep the camera strap around their neck when they use it and they all three do a good job, but still, they are kids!

I shopped around our local pawn shops and found a lightweight Fuji camera, with a viewfinder and LCD screen, they could use that wasn’t real expensive. I wanted the viewfinder as that’s what they were used to with the Instax camera. I paid $50 for a Fuji FinePix S4250 which is a 14mp camera with a 24x optical zoom. It only weighs a pound and is just the right fit for small hands! They’ve been using it for about six months now and it’s still working great, with limited drops! I just looked yesterday at a local pawn shop and they had one just like it for $30. I think if you shop around you can find something in the same price range.

I’ve been showing the kids copies of the pictures I shoot of them, pretty much their whole lives, so they’ve been exposed to what I consider photos with good composition for sometime. On the shooting and direction aspect of kids shooting photos at a young age, I’ve not tried to guide them a whole lot when it comes to composing their photos. Occasionally I might recommend they move in a little closer or perhaps stand in a different spot but, for the most part, I don’t look over their shoulder, point the camera for them and tell them when to press the shutter. I feel if I do that, it’s not really their picture they’re shooting. Do they always come back with what I think might have been the best photo? No, of course not, none of us do when we first start out in photography and many of us still don’t even after doing it for 40+ years, like myself!

As their photo editor (haven’t started the post production with them yet) I do occasionally crop their photos (digital) and make other minor corrections in editing, but for the most part the photos they shoot are theirs, the way they saw them.

Damion and uncle Jimmy at Pennyrile Forest State Resort Park. – Photo by April Pearson

And, now, the Roadtrip…. Recently my sister, April, and I took Damion with us to the Spring Photography Weekend at Pennyrile Forest State Resort Park in Dawson Springs, Ky, for his first photography competition in the children’s division. We all three had a blast! We’re planning to take Jayden to the Fall weekend there and then Xavier next Spring for their first “competition.” Getting the kids out shooting where other kids are involved I think is just another step in their adventure with photography.

Damion loved exploring and capturing photos along the way during the weekend. He told us that he hoped he’d win a trophy and he did!! First place in the landscape category and a third place in the water category! Not sure who was prouder, him or us! What he referred to as “Secret Caves,” were among his favorite spots, along with the waterfall, and his “Secret Steps” which is the photo that won him his first place trophy. I love the fresh viewpoint that the young kids have with their photography.

Where do I hope the kids go with this photography thing? Well, my hope mostly is that they have a love for photography and the world it opens for them.  So, when to start your young photographer out? I personally picked 4 years old, but you can start them whenever you feel they are old enough so that you can communicate with them, when they can understand and follow simple directions.  So that you can converse with them and they can understand you and you them!

Below are Damions two winning images from his first photo competition.

First Place Children’s Division – Landscape – Pennyrile Forest State Resort Park.

Third Place Children’s Division – Water – Pennyrile Forest State Resort Park.

If you’d like to follow the Shutterbug Kids, they have their own Website, Facebook and Instagram pages all maintained by me, their uncle Jimmy. Below are links to each of them. The boys aren’t directly involved with the social media aspect yet, although they do ask if I’m going to put their picture on Facebook sometimes, so they are aware.  That lesson will have to wait a few years, but they really enjoy seeing their pictures online.

Damion

Facebook, Instagram, Website

Jayden

Facebook, Instagram, Website

Xavier

Facebook, Instagram, Website

In closing, get out with your little ones, make memories and capture them together! You’ll be happy you did and they will as well!

2017 Pennyrile Forest Spring Photography Weekend

My entries for the 2017 Spring Photography Weekend at Pennyrile Forest State Resort Park in Dawson Springs, Ky plus a few more of my favorites.

[Best_Wordpress_Gallery id=”1″ gal_title=”2017 Pennyrile Spring Photography Weekend”]


Tips on shooting a time-lapse railroad video by Jim Pearson

Ft. Branch Indiana Time-lapse

In this post I’ll be talking about some of the many options available for shooting time-lapse videos of railroads, or any subject matter.

Time-lapse photography is a technique whereby the frequency at which film frames are captured (the frame rate) is much lower than that used to view the sequence. When played at normal speed, time appears to be moving faster and thus lapsing. For example, an image of a scene may be captured once every second, then played back at 30 frames per second; the result is an apparent 30 times speed increase. Time-lapse photography can be considered the opposite of high speed photography or slow motion.

Processes that would normally appear subtle to the human eye, e.g. the motion of the sun and stars in the sky, become very pronounced. Time-lapse is the extreme version of the cinematography technique of undercranking, and can be confused with stop motion animation.

Here is my most recent time-lapse video of CSX crews changing out a bridge in Ft. Branch, Indiana.

I use a Nikon D800 full frame camera when shooting my time-lapses. While many cameras, including an iPhone, are capable of doing this, my post will center around how I do mine using my equipment. At the end of the post I’ll list some other options available and by no means will this post or list be all inclusive. The above video was shot using a Nikkor 18mm a f/8 at an interval of 1 second.

I like using the D800 for doing time-lapse because when it’s finished shooting the camera combines all the individual frames together in the camera and saves them as a video instead of individual JPG or RAW files. So far I’ve only shot using JPG Fine because of file sizes and storage on my Compact Flash Card.

Plan Ahead – Think and plan ahead on how you’re going to do your time lapse and pick a good subject that will have plenty of action! It’s not a good idea to arrive 5 minutes before the action starts! Also, if you’re going to have to shoot on private property then you’ll need to obtain permission first. If it’s from public access then it’s not as big a problem. Above all else when photographing around trains or other heavy equipment you need to always be aware of your surroundings, stay safe and never trespass!

Don’t Forget Anything – When shooting time-lapse you can spend several hours standing by the side of the road out in the boonies so it’s good to be prepared! Not to sound like your mom, but you should take enough water and food. If it’s winter or foul weather then spare socks, shoes, warm coat and gloves. In summer, more water, a hat and sunscreen are must haves! A fully charged cell phone and something to read will help pass the time as well. Of course, it goes without saying your camera and tripod and all the batteries you can carry for your camera.

Batteries – Shooting a time-lapse will drain your batteries quickly so always take spares! If you shoot in 1 second intervals then that’s 60 photos a minute. Multiply that by an hour (gives you 30 seconds of video at a frame rate of 30 FPS) and you’re shooting 3,600 photos an hour! If you only have two batteries then consider taking your battery charger along and charging your spare battery in the car. The key is to keep the camera shooting pictures and if you run out of juice then your time-lapse will suffer for it.

Tripod – You need a good sturdy tripod! If you only have a lightweight one then consider attaching a weight to the center pole in order to give it more stability. If the camera moves or shakes between exposure it can result in a shaky video. This is extremely important if your shutter speed is on the slow side because of the lower light levels, which can make for some interesting blur effects.

Exposure Mode – Whatever camera you use, set it to manual mode. Any other mode where the camera controls and changes the aperture or shutter speed, the camera will try to correct every change of light and color temperature, which can result in a flicker in your video. “Flicker” is known as the unwanted effect that occurs in the “time-lapse” due to slight differences in exposure between shots.

Focusing – I suggest turning off the autofocus and doing so manually instead. While the time-lapse is exposing it shouldn’t cause a problem as long as you don’t touch the shutter button on your camera, but it’s better to be safe than sorry. You can use autofocus to focus once you have your framing setup and then turn it off during your time-lapse sequence. Don’t forget to refocus when you change your camera position.

Shutter Speed – I tend to keep my shutter speed a bit high, but here again it all depends on the light and time of day. If you’re shooting late in the evening or at night then you may have to use a slower shutter speed. When doing so keep in mind that if you’re shooting at 1 second intervals that with a 10 second exposure (low light photography) it’s going to take more than 1 second interval to record your file to your card. You may have to adjust accordingly.

Aperture and Exposure –  All lenses have a sweet spot (it’s sharpest point). I find that 2-3 stops from your widest aperture is the best. If shooting with a f/2.8 lens then that would be at f/8. Be sure to watch your exposure throughout the day and make sure it’s consistent. The sun move and exposure changes so to make sure it’s even throughout check it every time you change the camera’s position or at least once an hour, is my rule of thumb.

Lens – This all depends on your preference. Sometimes I’ll use a 24-70 so I have the option to zoom in on different aspects of the scene without changing lenses. On the time-lapse above I used a 18mm at f/8.

Time Lapse Duration – I personally prefer having the camera shoot a photo in the 1-2 frames a second range. The CSX bridge change video was shot at 1 second intervals.

To make your time-lapse a bit more interesting visually it’s best to stop the time-lapse and re-position the camera every so often to help give more visual impact.

A good app and the one I use to figure out my interval is called PhotoPhills. It runs $9.99 in the app store, but is well worth it and does a lot more than the time-lapse calculations. Click here for their website.

The app will help you figure out how often you need to expose, how long and how much room you’ll need on your card to store all the information that you capture. If your camera doesn’t combine everything together in the end to make your video your card may require a lot of space to store the thousands of JPGs or RAW files. Here’s a link to an online version of their Time-lapse Calculator you can use for free.

If your camera doesn’t combine your JPGs or RAW files then you’ll need to look for a program to combine all the resulting files into a video clip that you can edit. There are several programs available to do this, some of which are listed below.

One of the most popular is LRTimelapse. A few others are: GBTimelapse, Time-Lapse Tool and Panolapse. There is many more and to find them just do a Google search.

Here’s a good article on how to shoot time-lapse using your iPhone or iPad. There’s many other apps for doing this with your smart device. Just search your phone’s app store. How to Take Amazing iPhone Time Lapse Videos

To give my time-lapse the polished look complete with titles and transitions I use Adobe Premiere Pro CC, the online version. It’s available for a subscription fee of $19.99 a month. There’s many other programs available to edit video however and most all do a good job.

There is so much more to shooting time-lapse, but I hope this post will at least give you a good starting point and food for thought!

My day railfan trip that turned into a night trip!

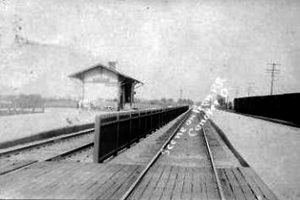
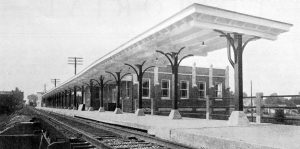
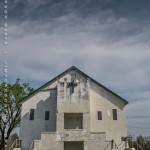
March 25, 2017 – The Princeton railroad station was built in 1875 and has been beautifully restored. Once housing the C&EI and L&N railways, it was the lifeline of commerce and transportation for the county. Passenger service was discontinued in the late 1960’s. The Princeton Train Depot is now home to the Gibson County Visitors Center and features a railway museum with a restored train caboose.

Sometimes I start out planning to do one thing when I set off on a railfan trip, but end up doing something different which usually results in nice photos I wouldn’t have gotten otherwise!

I try to do some railfan photography several days during the week, usually Wednesday, Thursday and Saturday. Mostly because on CSX’s Henderson Subdivision, which runs here through Madisonville, Ky, these are the busiest days.

Well, last saturday, March 25th, 2017, the weather was overcast and it was drizzling rain off and on most of the morning as I sat here working on the computer and trying to motivate myself to get out the door and on the road. Yes, I too sometimes have to motivate myself to take pictures! LOL

After posting a few queries on Facebook to a couple railfan groups, about current traffic for trains in the area I want to railfan, I finally decided that I was going to point my Toyota RAV4 north and see where it’d lead me!

Responses to the  Facebook posts were providing some info that trains were out there moving, just not a lot of them, so it seemed, but that never deters me as I always seem to find them. For me it’s not about the number of trains, but catching unusual or different angles, scenes or trains when I’m trackside. This day seemed to start out challenging, to say the least!

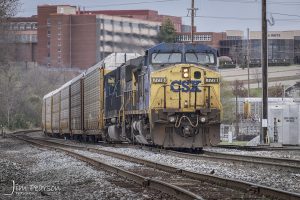
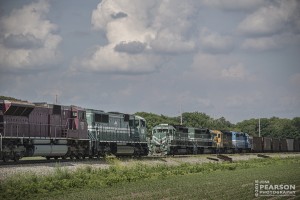
March 25, 2017 – CSX Autorack train Q247 arrives at the north end of Howell Yard in Evansville, Indiana.

Out of Madisonville I followed CSX’s Henderson Subdivision north to Evansville, Indiana and during the whole trip I only saw and heard (I use a scanner to listen to the train traffic) one train, a southbound, which I was too late in catching to get a photo! It wasn’t looking good! 50 miles and only one train? Maybe I should have stayed home, but the clouds in the sky were fantastic and I was determined to catch some trains with them!

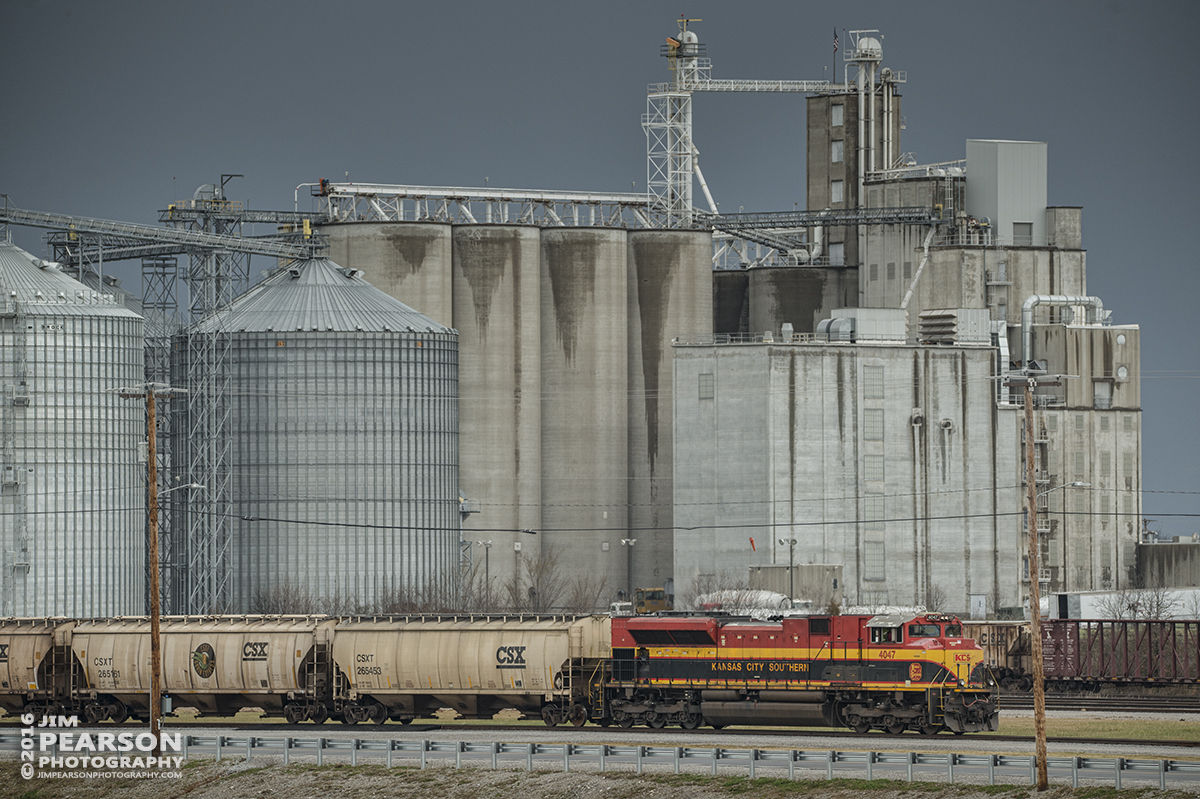
My first stop was CSX’s Howell Yards in Evansville, Indiana. This is a spot where you can drive all the way around the yard and get good shots from various angles. My favorite location however is on the west side of the yard across from the engine service facility. This is where I caught a autorack train coming into the yard heading south and empty coal train northbound from the yard. Knowing the route the coal train would take I decided to head on north toward Princeton, Indiana to get ahead of the coal train to catch it along its way north. This way I’d be sure of at least getting a few shots with a train.

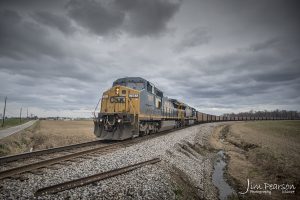
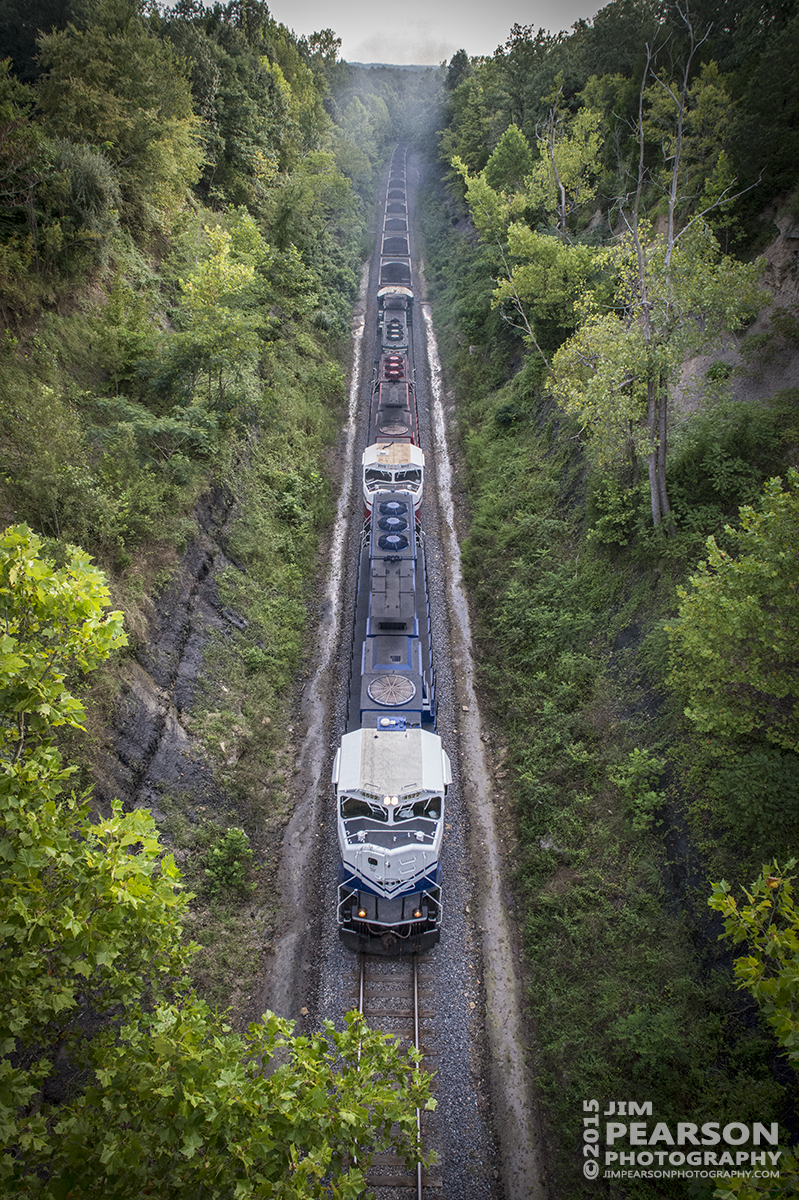
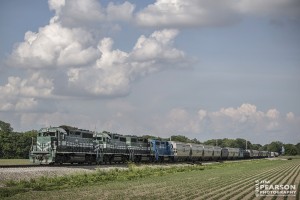
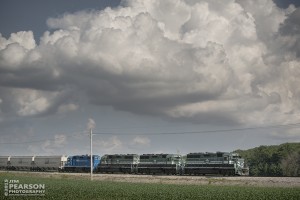
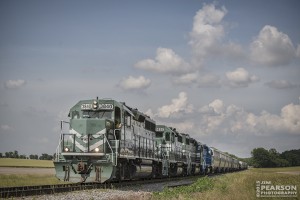
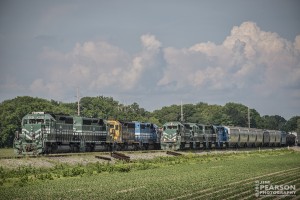
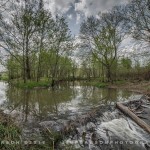
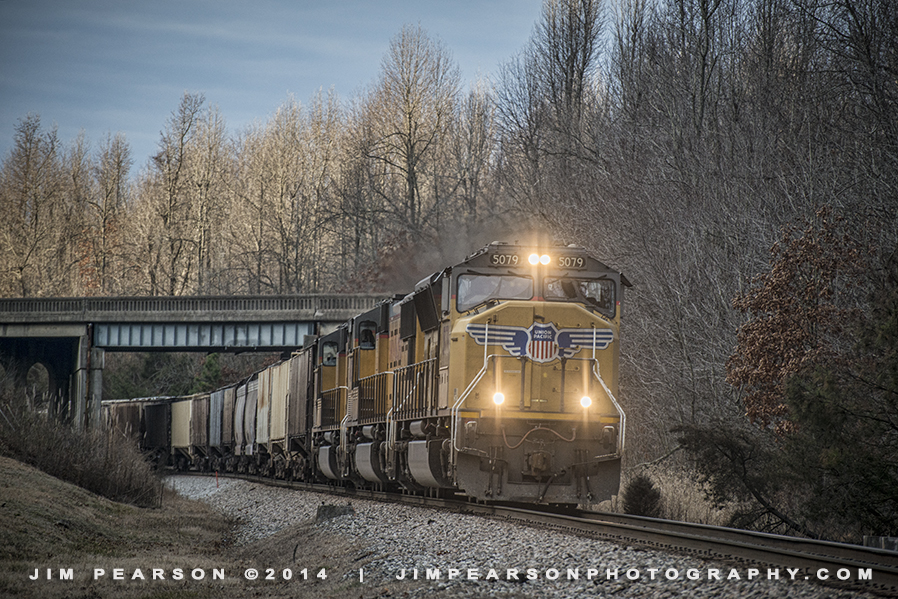
March 25, 2017 – Empty coal train CSX E234 heads through St. James Curve at St. James, Indiana as it makes it’s way north on the CE&D Subdivision.

The first spot I wanted to catch the coal train was a location known by railroaders as St. James Curve, which is just outside the small hamlet of St. James, Indiana, just past I-64 off of Hwy 41 north. After arriving and waiting about 5 minutes the coal train, E234, graced my presence as it swept through the curve into the frame to allow me to catch this sweeping photo with the beautiful clouds in the sky! First photo I was really happy with from the day!March 25, 2017 – CSX empty coal train E234 heads north through St. James Curve at St. James, Indiana, on CSX’s CE&D Subdivision.

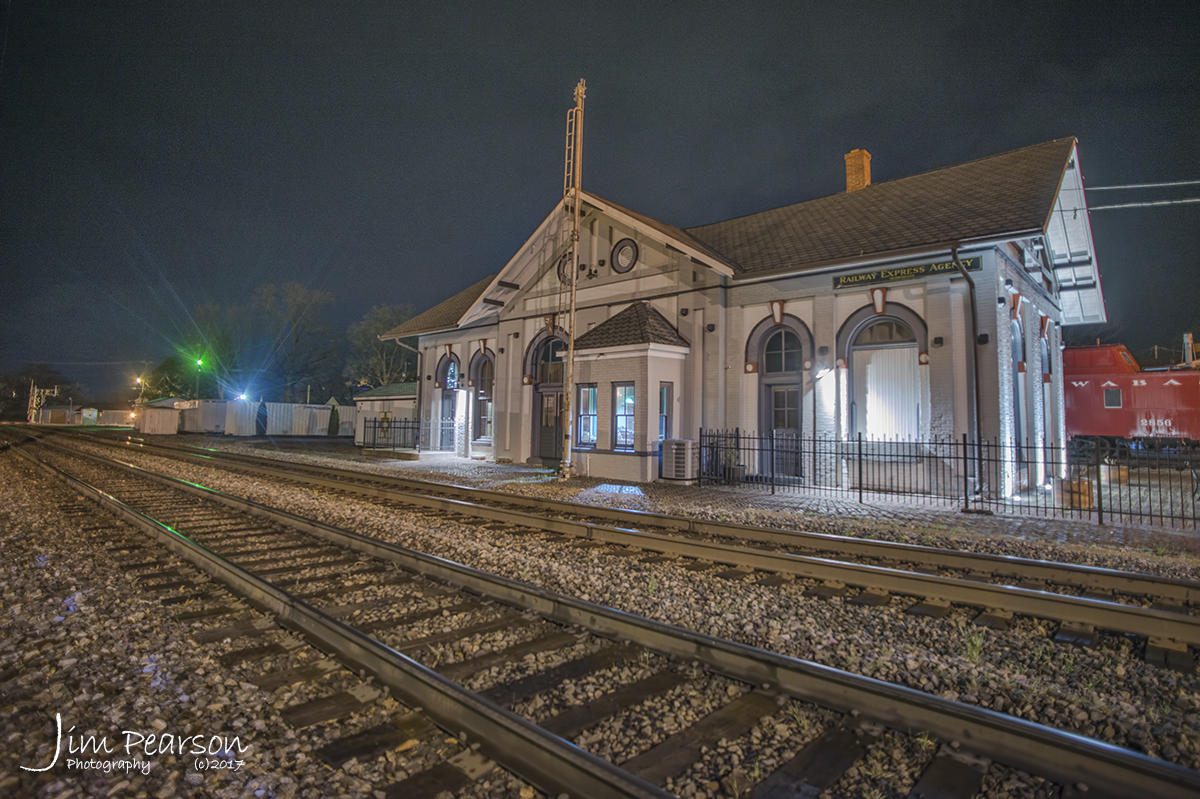
Knowing how fast the train was moving I knew I only really had one other spot I could get to before the train and that was the restored depot in Princeton, Indiana, which was the furthest I planned on going on this trip today.

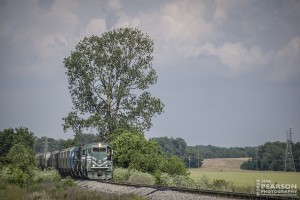
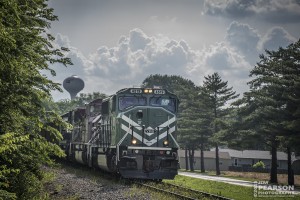
Again, I was rewarded with this shot as the coal train prepared to pass the station as it continued its trip north.

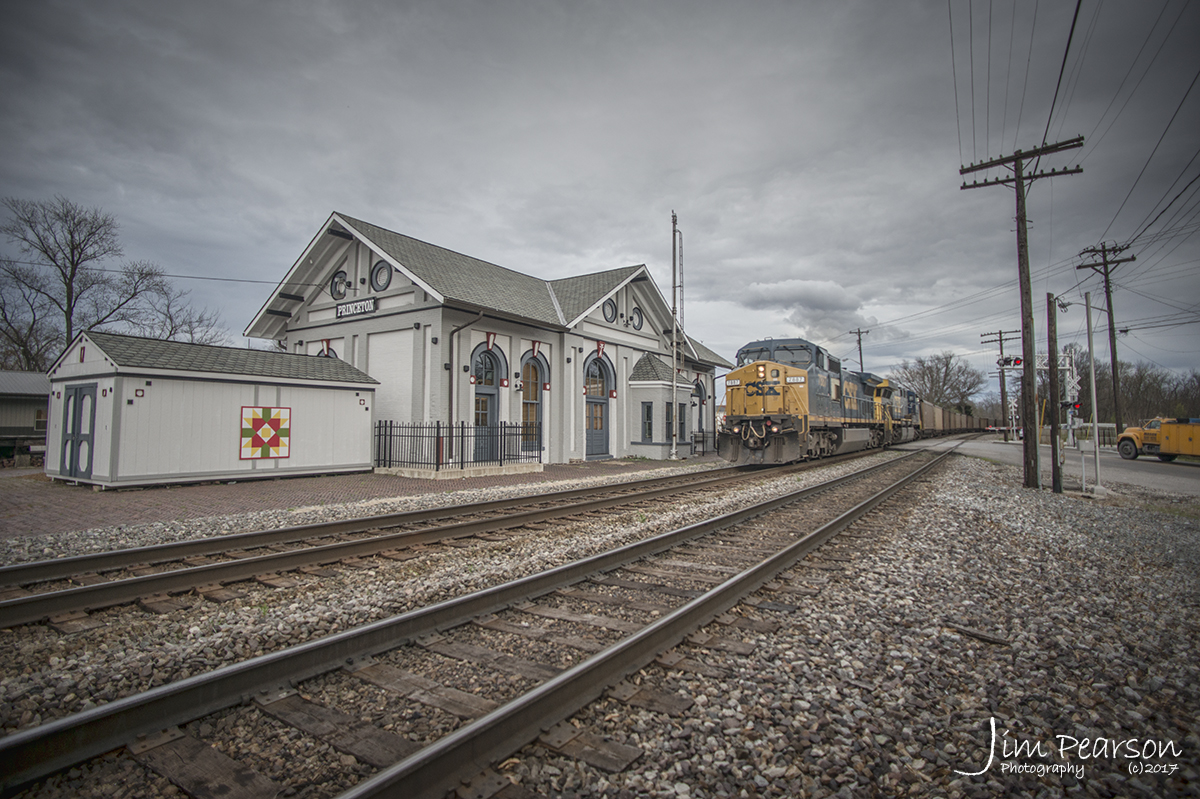
March 25, 2017 – CSX empty coal train E234 passes the depot at Princeton, Indiana as it heads north on CSX’s CE&D Subdivision. The station was built in 1875 and has been beautifully restored. Once housing the C&EI and L&N railways, it was the lifeline of commerce and transportation for the county. Passenger service was discontinued in the late 1960’s. The Princeton Train Depot is now home to the Gibson County Visitors Center and features a railway museum with a restored train caboose.

At this point I was satisfied that I had a couple nice photos in the camera, but still I wanted more!

I had been in contact with fellow railfan photographer Ryan Scott via Facebook Messenger and phone, since I got to Howell Yard in Evansville. He also was out railfanning and we decided to meet up at the depot in Princeton to visit and railfan together.

That’s where things started to change from my original plan! We spent time looking and shooting at the Norfolk Southern Yard at Princeton and along the other lines in and around town and at the Alliance Coal Mine loop where coal trains load. Ryan then suggested night photos! He’s not had much success on shooting photos at night and was looking for some tips and help. I hadn’t planned on staying trackside that late, but it had been quite awhile since I did any night work so I went for it.

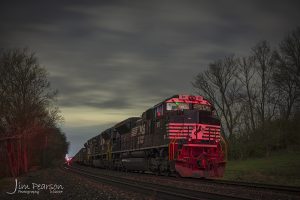
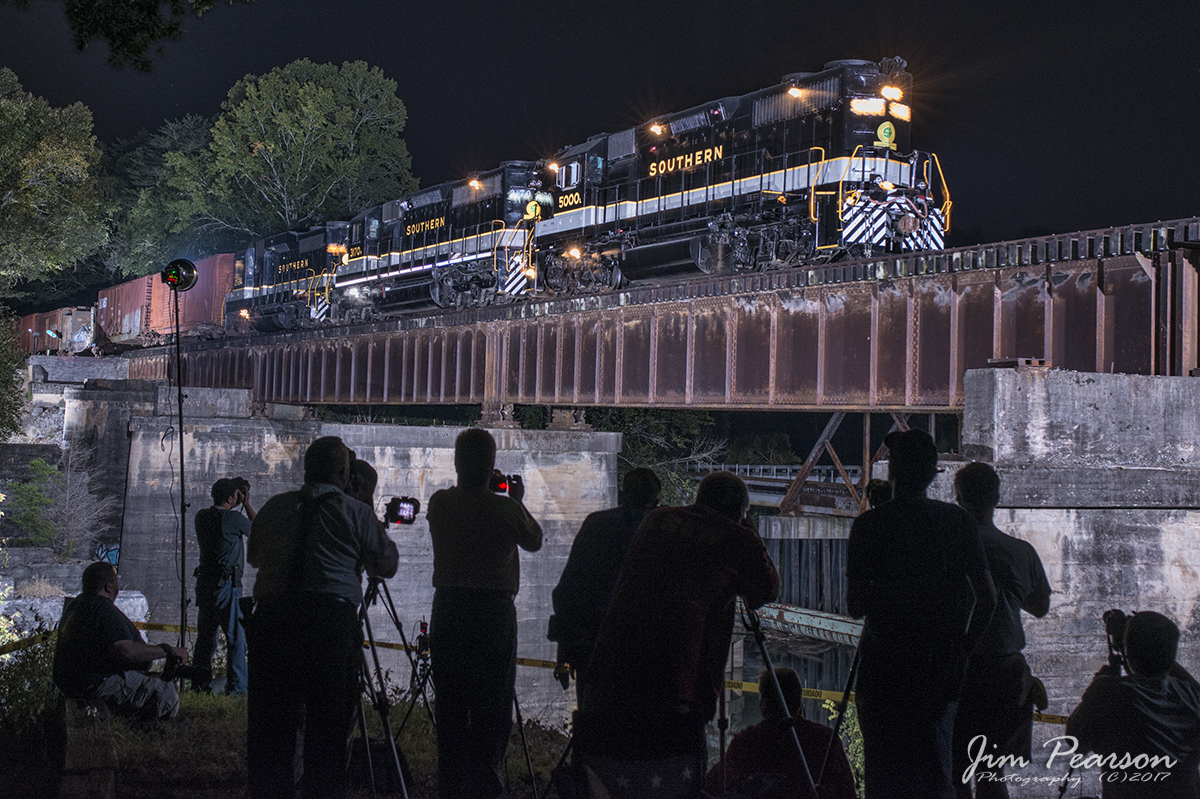
March 25, 2017 – The red light from signals light up the front of NS 871 with an empty Norfolk Southern coal train that tied down in Lyle Siding at Princeton, Indiana, waiting on a crew to take it on east on the NS Southern West district.

Now, for the railfan friends of mine that read this, here’s some of the tips I passed onto Ryan as we were shooting at Norfolk Southern’s Lyle Siding and in downtown Princeton during our night shoot that you might find helpful as well.

First, before we got out of the car, where we had some light, we set our cameras as follows:

  • Turn off auto ISO if you use it and set your ISO to 250.
  • Set your camera on manual and the shutter speed to 20 seconds with your lens aperture to it’s widest opening.
  • Remove any filters that might be on the lenses you’re going to shoot with. Otherwise you can get some ghosting in your photos when the lights reflect back into the filter.
  • Place your camera on a tripod!
  • Then set the self timer on your camera to somewhere between 3-10 seconds. This is to insure that there’s no camera shake, resulting in a blurred image, when you trip the shutter.

Review your first photo on your LCD screen. If it’s too dark, increase your exposure by giving it more time, ie 30 -60 seconds. If your camera won’t allow beyond a 30 second exposure then increase your ISO setting to give you another stop of light. That means go from 250 to 500 ISO, or something equivalent. I try to keep my ISO as low as possible as this helps to keep the noise (grain) down in the photograph. Keep adjusting like this until you get an exposure that you like and feel you can work in. If the photo is too light then of course you go in the other direction with your exposure.

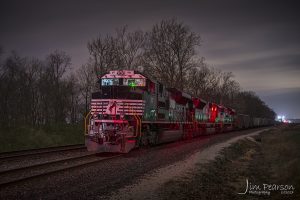
March 25, 2017 – Great time shooting some night action with fellow railfans Ryan Scott and Dave Kunkle! We caught this empty Norfolk Southern coal train that tied down in Lyle Siding at Princeton, Indiana, waiting on a crew to take it on east on the NS Southern West district. A big shout out to Dave Kunkle who was gracious enough to be our “grip” and use his hat to cover a bothersome light on one of the RR Boxes next to the crossing!

Focusing can be an issue when shooting at night as well. I usually bring a bright spotlight to shine on my subject to aid in focus, but since I didn’t start out planning to shoot night photos, I didn’t bring one. So, we had to improvise.

Change your focus point to center weighted so you have a single point to focus with. Then pick a bright spot on your subject and try to focus. If the camera can’t lock in the focus using the brightest spot, then see if there’s not something brighter about the same distance away that you can focus on. Another thing you can do if you are shooting with someone else, is to have your friend stand in a safe spot next to your subject and turn their smart phone’s flashlight on facing the camera and focus on the light from it. Of course you can manually focus as well, but for my aging eyesight I find autofocus works better for me.

Now, once you have the camera focused you need to turn off the autofocus on your lens or camera. Otherwise when you press the shutter button on the camera it’s going to try to refocus when you take the photo, probably resulting in an out of focus photo. I personally use the back focus button on my Nikon D800 and turn it off on the shutter button. This way I don’t have this issue. Most of your DSLRs have this feature. If yours doesn’t then you’ll have to turn it off on the lens between subjects.

Other than that, shoot a lot and check your focus after shooting each photo! Do this by viewing the photo on your LCD and zooming in tight to check your focus. Nothing more disappointing than shooting a bunch of photos to find they’re soft or out of focus, after you get back home.

As you can see from several of the photos here, I came away with some nice photos for not really having planned for shooting at night.

Oh, by the way, I left to start this trip at noon Saturday and by the time I got back home it was 12:30 am Sunday morning. Sometimes, things work that way though! All in all a good trip! Be safe out there when you’re trackside or traveling!

Where did my love of trains come from?

Road trips don’t always have to be somewhere far away or a long number of days on the road. As most of you know I’m pretty much hooked on trains! As such, I hit the road usually at least once a week to search for new and different train photos for my Facebook page, online sales store and also my website.

So, where did my addiction to photographing trains come from anyway?

PCC & St. Louis Railroad, Conover, Ohio

Well, I can’t really say for sure, but I’ve told my sister April and others that I think it comes from when we lived in Conover, Ohio, about a block away from the Pittsburgh, Cincinnati, Chicago & St. Louis Railroad, then commonly referred to as the Panhandle Route, which was was part of the Pennsylvania Railroad system. Of course I was only about 2 when we moved from there, so my sister and others say I couldn’t remember trains from that young an age. As for me, who knows for sure.

It possibly came from our mom’s brother who was my Uncle Willard Moore, who was a yardmaster at the then L&N Railroad’s Atkinson Yard here in Madisonville, Ky. I can’t however say that I ever recall going out to the yard to visit him there, but here again I was still young. I do remember walking the spur line that went to downtown Madisonville which came out to the bulk oil plant that ran alongside of the Government housing projects where I grew up most of my young years. We’d hike the tracks to downtown which was the center of the universe for a young kid back in the day when downtown was the happening place.

L&N Depot, Madisonville, Ky – (West Ky NRHS Photo Archive Photo from the Harold Utley Collection)

I recall passing the L&N depot when I’d walk this line with my brothers or friends. Can’t say I remember any passenger trains stopping there then, but I know they did when I was a kid.

I guess I can truly say that I recall the most when this addiction began of photographing trains, at least that I can remember for sure, was in Germany!

I had just finished a graduate course in Photojournalism at the S.I. Newhouse School of Communication at Syracuse University in 1978 where the US Air Force had sent me for training to be a Photojournalist (PJ) where I worked with Combat Camera until I retired in 1995. My first duty assignment was at Rhein Main Air Base, just outside Frankfurt Germany. This is where I met the Grant Family. Norm was our photo maintance man and he along with their son Dale and his wife Gloria, were all into trains and we struck up an instant friendship that carried us pretty much through our whole lives. Norm recently passed away, but I’m still good friends with Gloria and Dale (who is an engineer for BNSF Railway now).

Jim Pearson watches a maintenance operation from the cab of a German Steam engine outside Frankfurt, Germany in 1979. (Photo by Norm Grant)

I can remember to this day our train trips to downtown Frankfurt’s main train station where we’d spend countless hours photographing trains from the platforms there. I guess Germany and Europe in general was the place I fell in love with photographing trains. During all my travels, in the three years I was stationed in Germany, I always included photographing trains somewhere, on a regular basis.

After I left Germany and was assigned to Norton AFB in southern California where that love of photographing and chasing trains didn’t change at all and has continued through today.

People say why and I say why not! LOL Everyone’s got a hobby of some sort and this one has served me well over the years by taking me to places I might never of gone and allowing me to make friends with fellow railfans from around the world.

That’s my story and I’m sticking to it!

Me changing film at Lepzig, East Germany during an photo assignment in the area after the fall of the Eastern Block walls and fences. (Photo by Jose Lopez Jr.)


Railfanning CSX’s Henderson Subdivision

Here’s a map I setup on Google that shows most of my favorite spots to railfan on the Henderson Subdivision. Click view larger map in upper right corner (looks like a box) for better view and legend.

March 14, 2016 – Eagle, Gilbertsville, Ky

March 14, 2016 - While out chasing trains on the Paducah and Louisville Railway I decided to stop in at the eagles nest close to Kentucky Dam and the P&L right-of-way and caught this shot of one of them peeking over the top of the nest.

March 14, 2016 – While out chasing trains on the Paducah and Louisville Railway I decided to stop in at the eagles nest close to Kentucky Dam and the P&L right-of-way and caught this shot of one of them peeking over the top of the nest.

March 9, 2016 – Kansas City Southern engine at Hopkinsville, Ky

March 9, 2016 - Kansas City Southern engine leads CSX local J25-09 as it works in the south end of CSX's Casky Yard at Hopkinsville, Ky on the Henderson Subdivision. - Tech Info: 1/1000 | f/5.3 | ISO 400 | Lens: Sigma 150-600 @ 240mm on a Nikon D800 shot and processed in RAW.

March 9, 2016 – Kansas City Southern engine leads CSX local J25-09 as it works in the south end of CSX’s Casky Yard at Hopkinsville, Ky on the Henderson Subdivision. – Tech Info: 1/1000 | f/5.3 | ISO 400 | Lens: Sigma 150-600 @ 240mm on a Nikon D800 shot and processed in RAW.

August 9, 2015 – Paducah and Louisville’s UK engine 4522 at Rockport, Ky

August 9, 2015 - Paducah and Louisville's UK engine 4522 leads the charge up the grade north of Rockport, Ky as U of L engine 2013 and 4510 trail behind it, as they pull loaded coal train LG2 up the grade heading north to meet the empty LG1 coal train at Caneyville, Ky. At that point the two crews switch out trains and then take their trains either to be emptied or loaded. - Tech Info: 1/250sec, f/11, ISO 4000, Lens: Sigma 24-70 @ 24mm with a Nikon D800 shot and processed in RAW.

August 9, 2015 – Paducah and Louisville’s UK engine 4522 leads the charge up the grade north of Rockport, Ky as U of L engine 2013 and 4510 trail behind it, as they pull loaded coal train LG2 up the grade heading north to meet the empty LG1 coal train at Caneyville, Ky. At that point the two crews switch out trains and then take their trains either to be emptied or loaded. – Tech Info: 1/250sec, f/11, ISO 4000, Lens: Sigma 24-70 @ 24mm with a Nikon D800 shot and processed in RAW.

July 18, 2015 – A few Milky Way photos from Pennyrile Forest, Dawson Springs, Ky

July 17, 2015 – I got a bit far from the tracks today! Our local photography club, West Kentucky Photography Club of which I’m their president, had a Milky Way Photography Event at Pennyrile Forest in Dawson Springs, Ky. Here’s three of my favorite shots from the shoot! – Tech Info all photos: 30sec, f/2.8, ISO 4000, Lens: Rokinon 14mm with a Nikon D800 shot and processed in RAW. Click on each photo for a larger view.

July 4, 2015 – 4th Fest at Madisonville, Ky

July 4, 2015 - My favorite shot from yesterday's 4th Fest activities at the Madisonville, Ky City Park. This is one of the shots I did as part of a picture story for The Messenger Newspaper that will come out in their annual progress edition later on this summer.- Tech Info: 20sec, f/11, ISO 250, Lens: Sigma 24-70 @ 26 mm with a Nikon D800 shot and processed in RAW.

July 4, 2015 – My favorite shot from yesterday’s 4th Fest activities at the Madisonville, Ky City Park. This is one of the shots I did as part of a picture story for The Messenger Newspaper that will come out in their annual progress edition later on this summer.- Tech Info: 20sec, f/11, ISO 250, Lens: Sigma 24-70 @ 26 mm with a Nikon D800 shot and processed in RAW.

May 28, 2015 – A gallery of images from the Evansville Western Railway

A gallery of images from the Evansville Western Railway

2015 Pennyrile Spring Photography Weekend

As usual, I attended the annual Spring Photography Weekend at Pennyrile Forest State Resort Park, in Dawson Springs, Ky. These are the images I submitted in the Masters Division for the contest. Lots of great pictures taken by the 54 participants!

The categories were: Culture, Wildflowers/Fungi, Wildlife and Scenic Beauty. There were also three bonus categories which were Crofton, Ky, Funny and “Photoshopped.”


CSX V265-30 at Mortons Gap, Ky

December 31, 2014 - CSX V265-30, a empty UP powered grain train passes under the US 41 overpass as it heads north into Mortons Gap, Ky, with engine 5079 in the lead, as it heads towards Evansville, Indiana on the Henderson Subdivision.

December 31, 2014 – CSX V265-30, a empty UP powered grain train passes under the US 41 overpass as it heads north into Mortons Gap, Ky, with engine 5079 in the lead, as it heads towards Evansville, Indiana on the Henderson Subdivision.