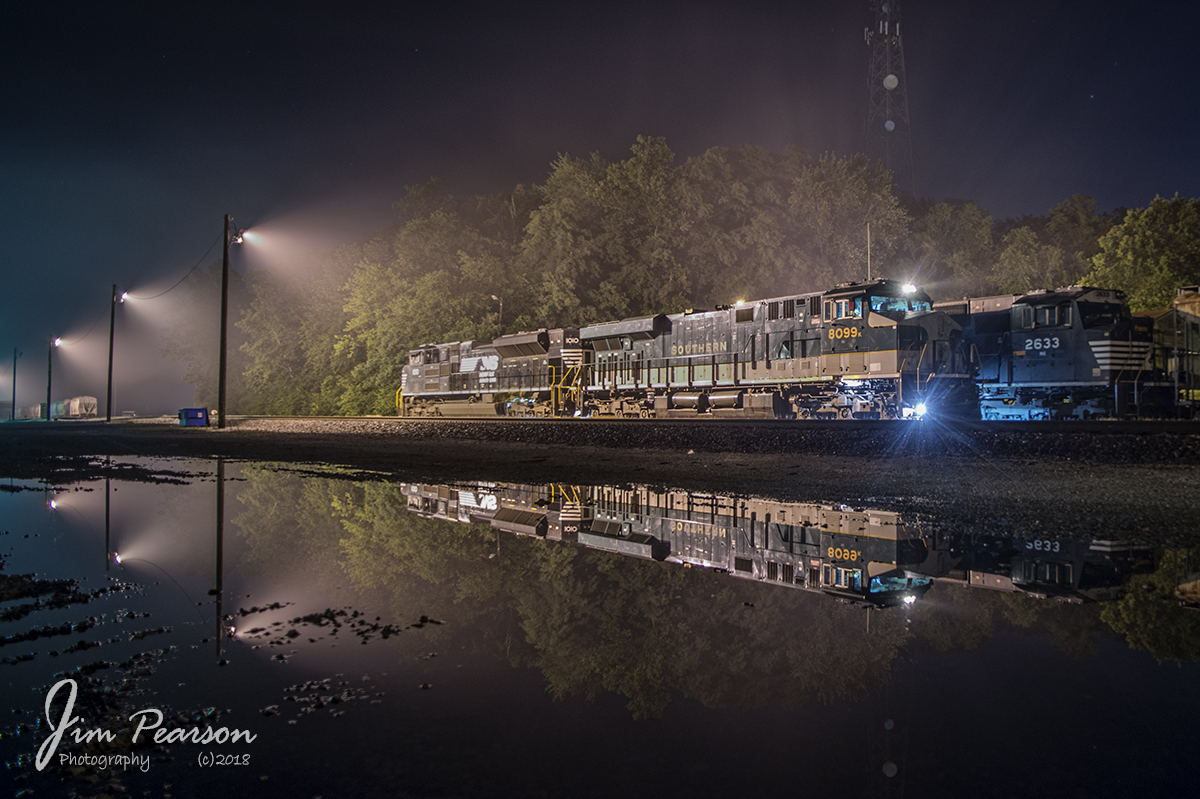
June 9, 2018 – Here we find a crew getting NS Heritage 8099, Southern Unit, ready for pickup by an, Duke Energy coal train, at the NS Yard Office in Princeton, Indiana, after storms passed through the area.
Today I’m going to break down the technical information on how I shot this photo of Norfolk Southern’s 8099 Southern Heritage Unit at Princeton, Indiana.
Here’s the technical info on the picture: Nikon 800, full frame camera with a Nikon 18mm f/2.8 lens. Exposure was ISO 200, f/2.8 at 6 seconds as a RAW file with Auto White balance and by default I underexpose my photos by a -.7 exposure. I find this helps me recover the highlights in the picture.
Now, my thoughts… Of course, the photo was shot on a tripod, thanks to Ryan Scott as I forgot to put mine back into my new RAV 4 before the trip. If you’re out shooting after dark, you really need to use a tripod for best results. You can brace your camera on a wall, or something stationary and get acceptable results, but for the best results, use a tripod.
When shooting at night I always set the mirror to lock-up before shooting the photo to help cut down with camera shake and set the self-timer to 3 seconds, so my hands are off the camera when the exposure is made. You can use a remote type device as well, but I find the self-timer works well for me.
Next, take your camera off Auto ISO! If you’re working on a tripod at night, you don’t need the high ISO and by setting it to manual, say around 200-400 ISO you’ll get a lot less noise (grain) in your photograph.
Exposure: I usually set my f/stop to the widest opening, ie: f/2.8 in this photo. If you’re planning on stopping down, I’d keep it at about f/5.6-8. That’s my preference anyway. Shutter speed is always going to depend on the light, but I’d start out at about 10 seconds, shoot a shot and then check your preview. If your photo is too dark, increase your exposure, not your ISO, unless you absolutely have to. If it’s too light and washed out, then shorten your exposure.
White Balance… I shoot everything with auto white balance turned on. This helps me in the RAW plugin to correct the off-color lighting of the yard lights, street lights, etc. best. At least it does for me. The lights to the left of this photo put out a bright orange light, so much so that I find it unsuitable for my taste.
We all have our own idea of how we want our final photograph to look and I’m no exception. I’m to the point these days that when I’m shooting a picture, day or night, I have a preconceived idea of how I want the final picture to look when I’m done processing.
Finding standing water to reflect your subject in will always add impact to your image, but sometimes that’s not an option, so look for other things that can help add impact. However, as an early mentor in my life told me about things in your photo, if it doesn’t contribute to what you want your picture to say, then eliminate it by changing your focal length or camera position. Try your best to shoot the photo in the camera the way you want your final image to look so you don’t have to do any cropping.
Any other questions just post them in the comments!
