August 29, 2020 - One of the things I love about this railfanning hobby of ours is the people, young and "older" alike! I and fellow railfan SteelRails Ryan Scott headed up to the Decatur, Illinois area for a day of railfanning. With the help of fellow railfans, Mike Jacobs, Isaiah Bradford’s Photography, Mark Jensen and David Higdon Jr. we had a great time and caught a lot of trains, which you'll see over the next few weeks! It was also great meeting Mike, Isaiah and Mark in person as I've been friends with them for sometime here on Facebook. Here everyone was shooting an approaching NS train that was arriving at Decatur, Illinois.

One of the things I love about this railfanning hobby…

August 29, 2020 – One of the things I love about this railfanning hobby of ours is the people, young and “older” alike! I and fellow railfan SteelRails Ryan Scott headed up to the Decatur, Illinois area for a day of railfanning. With the help of fellow railfans, Mike Jacobs, Isaiah Bradford’s Photography, Mark Jensen and David Higdon Jr. we had a great time and caught a lot of trains, which you’ll see over the next few weeks! It was also great meeting Mike, Isaiah and Mark in person as I’ve been friends with them for sometime here on Facebook. Here everyone was shooting an approaching NS train that was arriving at Decatur, Illinois.

September 4, 2019 - Part of the photo line during the night photo shoot in Duluth, Minnesota at a recent photo charter at the Lake Superior Railroad Museum on the North Shore Line.

The Photo Line!!

September 4, 2019 – Part of the photo line during the night photo shoot in Duluth, Minnesota at a recent photo charter at the Lake Superior Railroad Museum on the North Shore Line. I really enjoy taking part in photo charters! They give you an opportunity to photograph trains in spots that would otherwise be unavailable.

Meeting up with fellow railfans from Facebook

From left, Jim, Javid and Ryan waiting to shoot some street running action at La Grange, Ky – Photo by Adam Hill

This past weekend my good friend Ryan Scott from the Ft. Branch, Indiana area and I set-out on a day-long trip to photograph trains between Princeton, Indiana and what started out to be Louisville, Ky, but turned out to be La Grange, Ky. Our plan was to meet up with a fellow railfan friend of ours from Facebook, Javid Beykzadeh. Little did I realize that I’d end up meeting several more friends from Facebook while we were at it including, Adam Hill, Josh Kellerman, and Erik Landrum

The railfanning community is actually fairly large, if you take in the world and that’s pretty much what Facebook does for us. I have friends who are railfans from pretty much all over the world and it’s always cool to meetup in person in our travels in search of that perfect train picture!

All my family already know my obsession with trains and photographing them whenever I can. Even, my nieces and nephews know about my love for trains, and I hope that I’m passing some of that onto them, but I digress.

As railfan trips go, this was a really good one with Ryan and I photographing 5 different railroads before the day was over. Evansville Western Railway, CSX, Norfolk Southern, Indiana Southern Railway and Burlington Northern Santa Fe Railway. As day road trips go for me railfanning, this was a really good one!

Some of our group photographing Southbound with BNSF War Bonnet 791 at La Grange, Ky, – Photo by Jim Pearson


Other favorite photos of mine from our day-long trip are posted below.

June 9, 2018 – There’s just something about the lure of street running trains and when you throw in a BNSF War Bonnet, well, it makes it even better. Here we have a southbound CSX Q231-08 as begins to make it’s way through downtown La Grange toward Louisville, Ky.

June 9, 2018 Norfolk Southern Heritage Unit 8099, “Southern” passes the signal at milepost 209.8, at Jefferson Township, Indiana, as it makes its way west on the NS Southern-East District. This scheme is from the Southern Railway (GE) which originated as the South Carolina Canal and Rail Road Company in 1827. On Christmas Day, 1830, it put into service the nation’s first regularly scheduled steam passenger train, “The Best Friend of Charleston.” Southern was incorporated in 1894 from the reorganization and consolidation of numerous predecessors, and absorbed another 68 railroad companies over the next six years.

June 9, 2018 – Here we find a crew getting NS Heritage 8099, Southern Unit, ready for pickup by an, Duke Energy coal train, at the NS Yard Office in Princeton, Indiana, after storms passed through the area. We got lots of great photographs, which you’ll see over the days to come and also met-up with several fellow railfans in person that we’ve been friends with on Facebook for sometime!

June 9, 2018 Norfolk Southern Heritage Unit 8099, “Southern” passes the signal at milepost 209.8, at Jefferson Township, Indiana, as it makes its way west on the NS Southern-East District. This scheme is from the Southern Railway (GE) which originated as the South Carolina Canal and Rail Road Company in 1827. On Christmas Day, 1830, it put into service the nation’s first regularly scheduled steam passenger train, “The Best Friend of Charleston.” Southern was incorporated in 1894 from the reorganization and consolidation of numerous predecessors, and absorbed another 68 railroad companies over the next six years.


Technical information on how I shot this photo of Norfolk Southern’s 8099 Southern Heritage Unit at Princeton, Indiana

June 9, 2018 – Here we find a crew getting NS Heritage 8099, Southern Unit, ready for pickup by an, Duke Energy coal train, at the NS Yard Office in Princeton, Indiana, after storms passed through the area.

Today I’m going to break down the technical information on how I shot this photo of Norfolk Southern’s 8099 Southern Heritage Unit at Princeton, Indiana.

Here’s the technical info on the picture: Nikon 800, full frame camera with a Nikon 18mm f/2.8 lens. Exposure was ISO 200, f/2.8 at 6 seconds as a RAW file with Auto White balance and by default I underexpose my photos by a -.7 exposure. I find this helps me recover the highlights in the picture.

Now, my thoughts… Of course, the photo was shot on a tripod, thanks to Ryan Scott as I forgot to put mine back into my new RAV 4 before the trip. If you’re out shooting after dark, you really need to use a tripod for best results. You can brace your camera on a wall, or something stationary and get acceptable results, but for the best results, use a tripod.

When shooting at night I always set the mirror to lock-up before shooting the photo to help cut down with camera shake and set the self-timer to 3 seconds, so my hands are off the camera when the exposure is made. You can use a remote type device as well, but I find the self-timer works well for me.

Next, take your camera off Auto ISO! If you’re working on a tripod at night, you don’t need the high ISO and by setting it to manual, say around 200-400 ISO you’ll get a lot less noise (grain) in your photograph.

Exposure: I usually set my f/stop to the widest opening, ie: f/2.8 in this photo. If you’re planning on stopping down, I’d keep it at about f/5.6-8. That’s my preference anyway. Shutter speed is always going to depend on the light, but I’d start out at about 10 seconds, shoot a shot and then check your preview. If your photo is too dark, increase your exposure, not your ISO, unless you absolutely have to. If it’s too light and washed out, then shorten your exposure.

White Balance… I shoot everything with auto white balance turned on. This helps me in the RAW plugin to correct the off-color lighting of the yard lights, street lights, etc. best. At least it does for me. The lights to the left of this photo put out a bright orange light, so much so that I find it unsuitable for my taste.

We all have our own idea of how we want our final photograph to look and I’m no exception. I’m to the point these days that when I’m shooting a picture, day or night, I have a preconceived idea of how I want the final picture to look when I’m done processing.

Finding standing water to reflect your subject in will always add impact to your image, but sometimes that’s not an option, so look for other things that can help add impact. However, as an early mentor in my life told me about things in your photo, if it doesn’t contribute to what you want your picture to say, then eliminate it by changing your focal length or camera position. Try your best to shoot the photo in the camera the way you want your final image to look so you don’t have to do any cropping.

Any other questions just post them in the comments!

June 6, 2018 – Getting back into my newspaper days…

June 6, 2018 – Getting back into my newspaper days I caught CSX Q029-06 that was delayed at Crofton, Ky, on the Henderson Subdivision, as police removed 4 trespassers and two dogs from the train. Reports are that they boarded the train as it was stopped at Romney, Ky and someone reported it to CSX which stopped the train at Crofton where the conductor met a Christian County Sheriff and 8-9 other law enforcement, for a slow roll-by till they found them.

The “Hobos” were pretty surprised to see all the police presence, but a group of about 8-10 county and Hopkinsville City police were having lunch at the Crofton Diner next to the track when the call came over the radio and responded in force! They were removed from the train and sent on their way with a warning. – #jimstrainphotos #kentuckyrailroads #trains #nikond800 #railroad #railroads #train #railways #railway #csx #csxrailroad

I’m honored to find out that my photo…

I’m honored to find out that my photo of Chicago’s Tower 18 Interlocking has been has been selected as the First Place Winner in the 2017-2018 National Railroad Hall of Fame Photography Contest! If you make it to Galesburg Illinois for the Railroad Days Festival (June 23-24) stop by the public exhibition drop by and check out all the photographs in the exhibit!

March 23, 2018 – Three “L” Rapid transit trains pass through tower 18 junction, just down from the Chicago Transit Authority’s Clark/Lake Street Station, during the evening rush hour in Chicago, Illinois. For decades, the Tower 18 junction at Lake & Wells was billed as the busiest railroad junction in the world. – #jimstrainphotos #illinoisrailroads #trains#nikond800 #railroad #railroads #train #railways#railway #cta #commutertrains.

2017 Nashville Steam Open House

October 13, 2017 – I went to the Nashville Steam event and came back with this gallery of photos! – It was a fundraising event for the restoration of Nashville, Chattanooga and St. Louis Rwy. No. 576 to operate excursions out of downtown Nashville, Tennessee. Great time had by all and a very worthy cause. For more information on how to help support the restoration of 576 visit the group’s website at: http://www.nashvillesteam.org


Where did my love of trains come from?

Road trips don’t always have to be somewhere far away or a long number of days on the road. As most of you know I’m pretty much hooked on trains! As such, I hit the road usually at least once a week to search for new and different train photos for my Facebook page, online sales store and also my website.

So, where did my addiction to photographing trains come from anyway?

PCC & St. Louis Railroad, Conover, Ohio

Well, I can’t really say for sure, but I’ve told my sister April and others that I think it comes from when we lived in Conover, Ohio, about a block away from the Pittsburgh, Cincinnati, Chicago & St. Louis Railroad, then commonly referred to as the Panhandle Route, which was was part of the Pennsylvania Railroad system. Of course I was only about 2 when we moved from there, so my sister and others say I couldn’t remember trains from that young an age. As for me, who knows for sure.

It possibly came from our mom’s brother who was my Uncle Willard Moore, who was a yardmaster at the then L&N Railroad’s Atkinson Yard here in Madisonville, Ky. I can’t however say that I ever recall going out to the yard to visit him there, but here again I was still young. I do remember walking the spur line that went to downtown Madisonville which came out to the bulk oil plant that ran alongside of the Government housing projects where I grew up most of my young years. We’d hike the tracks to downtown which was the center of the universe for a young kid back in the day when downtown was the happening place.

L&N Depot, Madisonville, Ky – (West Ky NRHS Photo Archive Photo from the Harold Utley Collection)

I recall passing the L&N depot when I’d walk this line with my brothers or friends. Can’t say I remember any passenger trains stopping there then, but I know they did when I was a kid.

I guess I can truly say that I recall the most when this addiction began of photographing trains, at least that I can remember for sure, was in Germany!

I had just finished a graduate course in Photojournalism at the S.I. Newhouse School of Communication at Syracuse University in 1978 where the US Air Force had sent me for training to be a Photojournalist (PJ) where I worked with Combat Camera until I retired in 1995. My first duty assignment was at Rhein Main Air Base, just outside Frankfurt Germany. This is where I met the Grant Family. Norm was our photo maintance man and he along with their son Dale and his wife Gloria, were all into trains and we struck up an instant friendship that carried us pretty much through our whole lives. Norm recently passed away, but I’m still good friends with Gloria and Dale (who is an engineer for BNSF Railway now).

Jim Pearson watches a maintenance operation from the cab of a German Steam engine outside Frankfurt, Germany in 1979. (Photo by Norm Grant)

I can remember to this day our train trips to downtown Frankfurt’s main train station where we’d spend countless hours photographing trains from the platforms there. I guess Germany and Europe in general was the place I fell in love with photographing trains. During all my travels, in the three years I was stationed in Germany, I always included photographing trains somewhere, on a regular basis.

After I left Germany and was assigned to Norton AFB in southern California where that love of photographing and chasing trains didn’t change at all and has continued through today.

People say why and I say why not! LOL Everyone’s got a hobby of some sort and this one has served me well over the years by taking me to places I might never of gone and allowing me to make friends with fellow railfans from around the world.

That’s my story and I’m sticking to it!

Me changing film at Lepzig, East Germany during an photo assignment in the area after the fall of the Eastern Block walls and fences. (Photo by Jose Lopez Jr.)


All Things Trains and Photography- Trackside Video

This month’s photography column will be all about the equipment and software for capturing trackside videos using your smartphone.

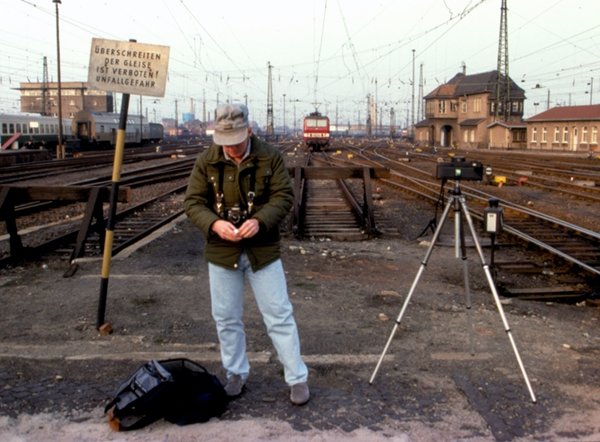
From a composition standpoint video photography of trains is pretty much the same as regular still photography except of course you capture motion and can put together sequences and titles to help tell the story.

Turning your phone horizontally (to landscape mode) is the best way to record all your smartphone videos. Period! It’s much easier to handle the phone this way and you won’t see those annoying black side bars when watching your video on a large screen. Also, don’t forget that your TV and Computer Monitors sit horizontally and not vertical.

Plus, everything looks much beautiful recorded in horizontal (more room for your subject) vs. an ugly compress square. This format might be okay for Instagram photos, but not for videos.

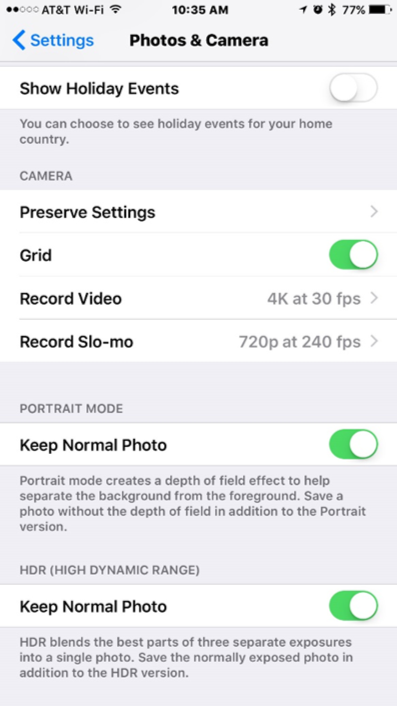
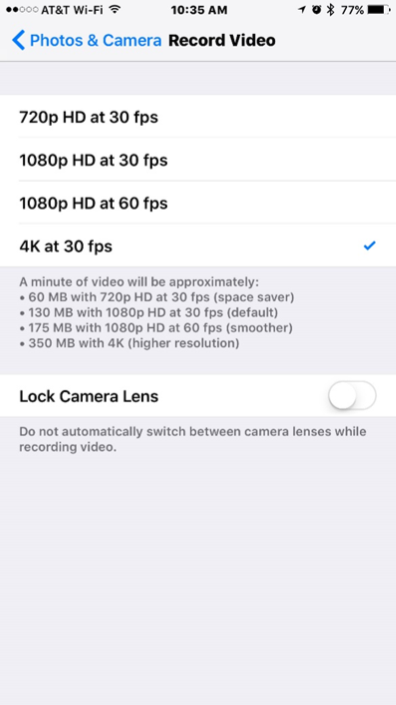
Depending on which smartphone you have will determine the quality of your video. The newer iPhones come with 4K video resolution (a far cry from the VHS days!), which is about as high a quality you can get these days. However, you need to make sure it’s set to record in the highest quality by paying a visit to the settings on your device. Be aware, the higher the quality of your video the larger your video file is and the more space it will take. Also, it will take longer to upload if you posting it online.

Below are screen grabs where you can set your video quality on the iPhone. Not sure where it is on other smartphones, but should be somewhere under your settings.


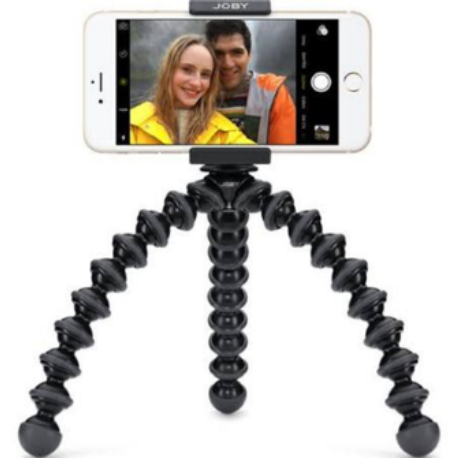
One sure sign of an amateur video recording (besides a video done with low lighting) is a shaky video. So, stop holding your iPhone and mount it on a stand. Working with a mounted iPhone will also prevent your shot from going out of focus.

One mount for the iPhone and other smartphones is the GripTight GorillaPod stand made by Joby. This flexible iPhone mount is an ideal accessory for all videographers on-the-go.

The stand is compact, doesn’t take up too much room and holds the phone safely and securely and can also be attached to poles and tree limbs. The GripTight mount can also be attached to most other tripods via a universal ¼” screw.

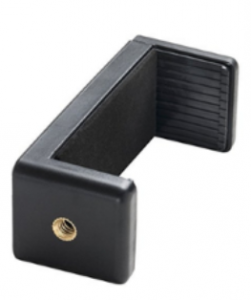
I personally use a regular tripod for my video work and attach my camera using the device below. It runs $8.99 on Amazon Prime. Click on the photo for a link. There’s many others available however if you just do a search.


If you don’t have a tripod, one stabilization trick is bracing yourself against something such as a light pole or tree. Another is to bring your elbows in tight against your body, which will give you more stability. Holding your breath during shots can also help minimize shakiness if you are hand-holding the phone on a solid surface.

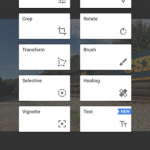
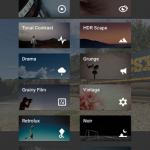
While editing your video on the smartphone can be done, if you’re going to be serious about your video work it’s best to do it on a desktop computer. The controls are much easier to use. There are many programs out there that allow you to do this and one’s probably already installed on your Windows computer called Movie Maker. Many others are available as well on the market. My favorite is Adobe Premiere Pro. It’s a monthly subscription software that runs about $20 a month. I do a lot of video work for my church however and so I go with this heavy-duty software. Do a Goggle search and you’ll find all kinds of software, some free and some paid.

As for editing on the smartphone itself? I use an app called Cameo a lot, but I also use MoviePro, Pinnacle Studio Pro and iMovie. Easiest way to learn to use these programs is to shoot some video and play around with them. You can also search on YouTube for the app and find tutorials there as well. Other apps that get top reviews are, Videoshop, Splice, Quik and Video Crop. There are many others however.

Many of the above apps will also allow you to shoot video instead of using the built-in camera. These apps and others such as Filmic Pro allow you to have much more control over the shooting of your videos.

If you plan on doing a lot of long videos, then I recommend getting a battery pack for whatever kind of smartphone you have. Video recording will eat the battery on your phone quick.

Also, in closing, I recommend that you don’t zoom! Most smartphones use digital zoom and the quality of your video will suffer greatly if it does. If your phone has optical zoom or you have add on lenses for your phone, then they should be fine. Digital zoom only enlarges the pixels on your phone and lowers the quality of the video and photo.

Hope this hasn’t left your head spinning too much. If you have questions, please feel free to drop me an email at jim@jimpearsonphotography.com

Here’s a link to a good video on Best Video Editing Apps for iOS
https://www.youtube.com/watch?v=KrpHWyBgYW0


All things trains and photography by Jim Pearson – Using Snapseed to edit your photos

picture17This month we’re going to take a look at the free, yes I said free, app for editing your photos on iPhone, Android, Mac and the PC. The app was originally developed by NIK Software, but has since been bought out by Google, which distributes it. You can find it available in the app store or by searching on Google.

This is my go to app for editing pictures that I shoot on my iPhone 6s when I’m out trackside or anywhere else taking photos. It’s super easy to use and there’s tutorials available all over the web. I’ll provide links to some at the end of this column. Also, I’ll provide a brief overview for you in this column.

Click on thumbnail for larger photo

Click on thumbnail for larger photo

When you first open Snapseed you’ll get the opening screen which prompts you to select and open the image you want to work with. You have several options. You can choose a photo from your camera roll, or whatever your device calls it, take a photo with the camera, open your latest image or paste in a copied image.

Once the image is open you’ll notice several options at the top of your screen which are Open, which opens a new image, Save, which gives you several options which include, save, save a copy and cancel. I use the Save a copy option as it allows you to go back and made changes to what you’ve done to the photo in Snapseed. It also preserves your original photo. Next to the Save feature is a small white square that will contain numbers as you apply different effects to your photos. These edits, called stacks or layers, allow you to revisit something you’ve done to the photo and change or delete the edit.

To the right of the small white square are three white dots. Tap this to access other options including, Undo, Revert, Share, Help and Cancel.

Click on thumbnail for larger photo

Click on thumbnail for larger photo

After you’ve opened your image you’ll notice a large round dot with a pencil in it in the lower right of the screen. Tap this to bring up your tools for editing. They’re pretty intuitive and easy to figure out. Under TOOLs you’ve find Tune Image, which allows you to adjust everything from brightness to shadows. Once you selected it just press and hold down on the screen to bring up a menu to change between the different options. Once you’ve selected an option slide you finger back and forth across the screen to change the effect. This procedure is the same in all the features you’ll encounter in Snapseed. To apply your changes just click on the checkmark on the bottom of the screen. If you want to see your histogram click on the small icon on the left of the screen.

Click on thumbnail for larger photo

Click on thumbnail for larger photo

Also under the tools screen you’ll find FILTERS (left). These allow you to apply creative effects to your photos such as Lens Blur, HDR Scape, Black and White along with many more. It also has an option for adding frames to your image as well. Playing around with them is the easiest way to figure out what each one does. If you decide you don’t like an effect just click on the small x on the screen at the bottom left where you’re editing and cancel the edit.

If you want to zoom into your photo during an edit, just pinch in or out and use the navigation box by using the blue box that appears in the lower left corner.

Once you’ve edited your picture to look the way you’d like just click on the save button in the upper right corner and choose the option you wish to use. As I said before, I highly recommend the Save a copy option.

Also, for help, there’s a button at the bottom of the screen that says “Insights.” Click on it to bring up tutorials and videos on how to use Snapseed.

Other good resources are:

¨ Snapseed on YouTube: https://www.youtube.com/channel/UCqTgGRgp5CRHhUJKeRraQgw/How to use Snapseed

¨ http://www.mobiography.net/apps/how-to-use-snapseed-to-enhance-your-mobile-photography/

¨ Google Support: https://support.google.com/snapseed/

¨ Download in from the App Store for your device or by search for Snapseed Download on Google.com


August 2016 – All Things Trains and Photography by Jim Pearson

Welcome to my first installment on this new column! I hope that everyone gets at least something from my ramblings here!

South Tunnel

On July 22, 2016 I made a trip to find the South Tunnel on CSX’s Mainline Subdivision. I didn’t catch a train unfortunately, but this shot taken with my iPhone 6s really doesn’t need one! Look for photos that can provide you with good leading lines to help draw your subject into your picture!

The Best Camera
I’m often asked what’s the best camera to use when taking photographs? My short answer is, the one you have with you! It doesn’t really matter what brand you use or like as long as you get out trackside and shoot pictures!

Now, of course some cameras offer better results than perhaps others, but what it all comes down to is that it’s the person behind the camera that “makes” the picture, not the equipment you use! I shoot and have seen others shoot with everything from smartphones to high priced digital cameras, but what it really comes down to a lot is you, the photographer and how you see and capture the scene before you! That’s what I love about photography, the ability to decide when and what I want to photograph. No one else tells me, or you, when to press the shutter.

August 5, 2016 – Southbound CSX loaded coal train N320 (Evansville, IN (EVWR) - Cross, SC) meets W987-30 with a load of windmill motors waiting to go north from the north end of Hanson siding as N320 makes it's way south on the Henderson Subdivision at Hanson, Ky.

August 5, 2016 – Southbound CSX loaded coal train N320 (Evansville, IN (EVWR) – Cross, SC) meets W987-30 with a load of windmill motors waiting to go north from the north end of Hanson siding as N320 makes it’s way south on the Henderson Subdivision at Hanson, Ky.

Simple advice to keep in mind when shooting pictures. First and foremost, if something in your picture doesn’t contribute to what you want the final photo to say then eliminate it when your shooting. Do this by getting closer, lower, higher, picking up trash or whatever else it takes. It’s much easier to do it before you shoot than it is to have to do it in the computer. Second, when shooting trains, don’t get hung up on the direction of the light! It is what it is and you can’t always control it. You have to shoot the picture when the train and you are there! Third, don’t shoot everything from eye level! Get low sometime to add drama to your pictures, or high sometimes to give a different perspective. Fourth, don’t shoot just on bright and sunny days. Great pictures are to be made on cloudy, rainy, snowy filled days.

Fifth, don’t put the camera away when it gets dark! Drag out the tripod or fast lens and shoot! There’s great pictures to be made during twilight and after dark. Sixth, Study the pictures of photographers you like! Ask yourself questions such as why did he shoot form this angle, time of day, etc. Seventh, look for things to photograph that are different. Heritage Locomotives, Steam Engines, Unusual paint schemes, obscure out of the way short lines, trains with different types of cargo, etc. I hope some of these help and good luck trackside and always be safe! Keep Clicking!!!